Last updated on August 6th, 2022 at 04:02 pm
Instead of showing empty report sections because a query produced no results, I wanted to add some text to explain the outcome. I turned to an option called, No Rows, in order to populate the space with text. This blog post shows you what steps to take in order for you to make it happen too!
Background
Unfortunately, this is a bit of a long story. I was updating a report within Enhansoft Reporting called, Computer Software Update Details by Classification, because I found out that Microsoft had tweaked the SQL Server performance of Role-Based Administration (RBA) functions. These functions now only take a few seconds versus a few minutes! You can read more about this in my blog post, “RBA and Non-RBA Queries: When is Slower Actually Faster?”
Anyways, in the older version of the report, if there was nothing to report for a given Software Update (SU) classification (there are nine classifications in total), nothing is displayed. The corresponding section is hidden. Why show anything if there is nothing to show?
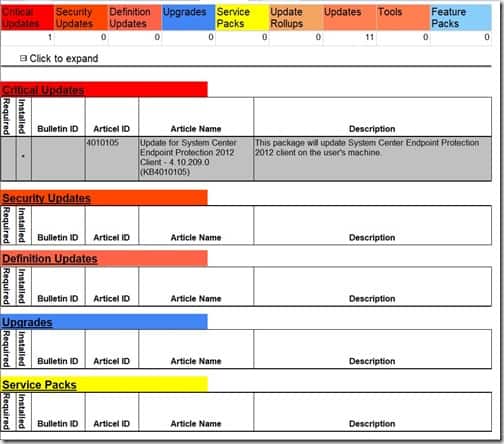
In order to take advantage of the new RBA function performance gains, however, a slightly new approach was needed. Instead of one query for each SU classification, only one query for all classifications was needed. Naturally, combining nine different SU classification queries into one lead to another problem. I could no longer hide a section if there was nothing to report. The end-result made the report look like it wasn’t working properly, as you can see in the screenshot below. How did I fix this problem? The answer was to use an option called No Rows.
What is the No Rows Option?
No Rows is an option on a matrix, table, chart, sub-report, etc., that displays alternate text when the results of your query display no results (aka no rows). I show you in the screenshot below why you should use it, but it all comes down to personal preference. For me, I like to quickly confirm that a report is working as expected, and more importantly in this instance, what SUs need my attention.

Doesn’t this report look unfinished? Plus, how do you know if the report is working correctly or if there’s a glitch? Let’s fix this report.
Configuring No Rows
I’m using Visual Studio BI in this example, but this tip works for Report Builder too. Therefore, all of the steps are basically the same for Report Builder.

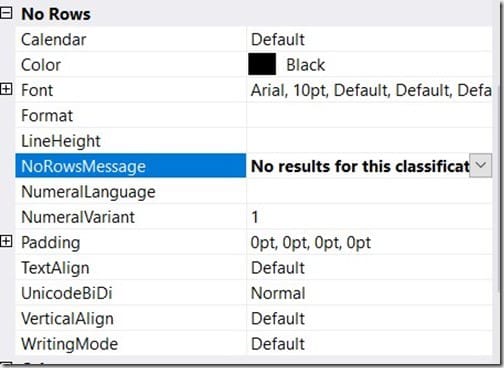
In the Visual Studio BI tool, open the report that you want to edit. Next, select the matrix or table that you want to use with the No Rows feature. In Properties, scroll down to the No Rows section.

In the NoRowsMessage row, enter the message that you want to display. At this point you are done.

When I previewed the results, however, I wasn’t happy with how the text was jammed-up into the top left-hand corner. I went back to the No Rows section and edited the options until I was happy with the results.

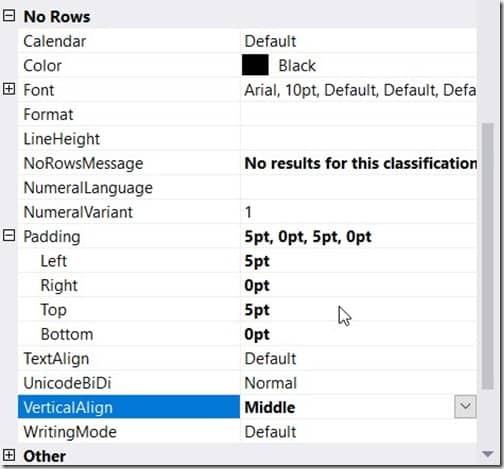
Here are my minor changes to the No Rows section.
First, under the Padding subsection, I added 5pt padding to the Left and to the Top of the cell. Next, for the VerticalAlign option, I changed it to Middle.

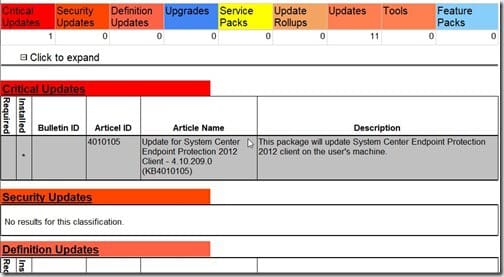
Now when I preview the results, the note is within the center of the text area and therefore it is easier to read. As you probably saw, there are far more options within the No Rows section that allow you to customize the text displayed when there are no results (no rows). I suggest that you take some time to explore each of them and see what works best for you.
If you have any questions about the No Rows option, please feel free to contact me at @GarthMJ.
