Last updated on July 27th, 2022 at 11:01 pm
Hi Everyone! In this blog post, I am going to talk more about the SSRS date range prompt epiphany I had after creating my first Power BI date range slicer. In a new Power BI version of a Warranty Information Reporting report, I created a slicer in order for users to set a date range between a start date and an end date. You can read more about it in last week’s post, How to Create a Power BI Date Range Slicer. I used a date range slicer because Power BI did not have something similar to the calendar date prompt I used in the SSRS version of the same report. After my epiphany, I approached our Chief Architect, Garth Jones, with my date range prompt idea. He admitted that he was also thinking about doing the same thing with this SSRS report, so off I went to carry out my plan.
Time after time, I see how using SSRS’s expressions and built-in features give you several different ways to successfully complete a task. I already knew exactly what the prompts were supposed to do, so I simply assessed all the possibilities and picked the one with the best fit. In this blog post, the same report, List of Computers by WIR Checkdate, is used as the one seen in my two previous posts, and I am creating almost the same prompt as the one in, How to Create a Date Prompt in SSRS, but with a small change.
SSRS Date Range Prompt
The idea is to create the same functionality with this prompt as the Power BI slicer. At its core, it is really simple – create two prompts. In addition, I am going to set the default values for each prompt this way: one has the oldest date and the other one has the newest date. Really, that’s it! Setting the default values is fairly simple to do too.
Steps to Create a SSRS Date Range Prompt
Before beginning, I want you to see what the end result looks like in the screenshot below.
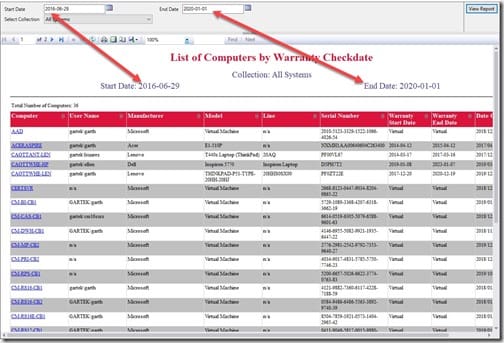
In the image, you can see the two date prompts. The starting date is the oldest warranty checkdate and the end date is the newest warranty checkdate within the database.
Main Dataset Query
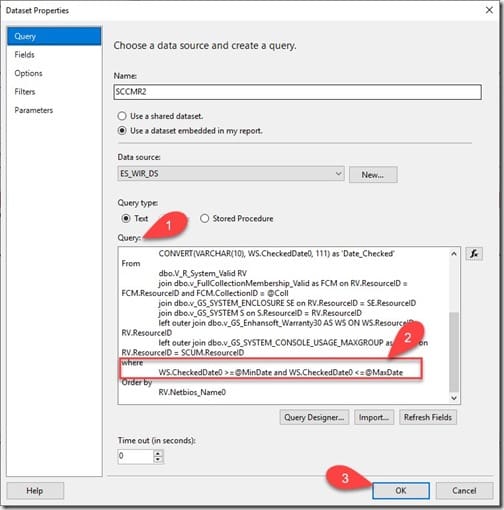
In order to allow for the date range to work, I first needed to edit the main dataset Query (#1) which you can see in the above image. I simply added a WHERE (#2) clause that’s a comparison between the start date (MinDate) and the end date (MaxDate) variables. Once I did that, I clicked on the Refresh Fields button and then I clicked on the OK button (#3).
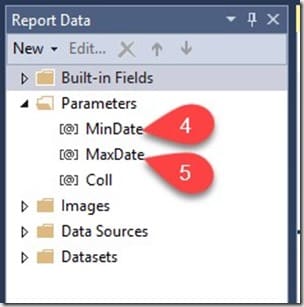
The variables are automatically picked up and added under the report parameters. Shown in the above image is the @MinDate (#4) for the start date and @MaxDate (#5) for the end date.
Extra Dataset
Now, I needed to get the oldest and newest dates as the default values for this prompt, so I added an extra dataset. There are no tricks to this process. I just used the Min and Max SQL Server functions to determine this information.
select
Min(Convert(date,WIR.CheckedDate0,102)) as ‘MinDate’,
Max(Convert(date,WIR.CheckedDate0,102)) as ‘MaxDate’
from
dbo.v_R_System_Valid RV
join dbo.v_GS_Enhansoft_Warranty30 AS WIR on RV.ResourceID = WIR.ResourceID
Prompts
Now I am going to configure the date prompts I’m using in this dataset.
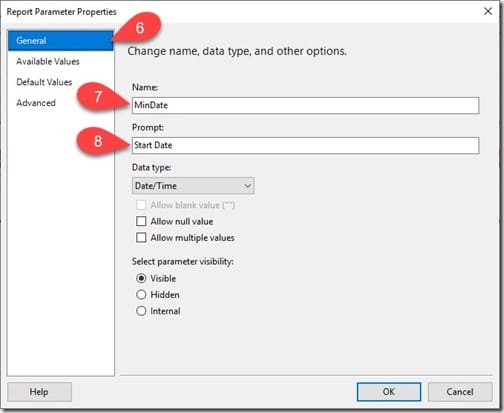
Using the already created MinDate prompt, I open Report Parameter Properties and select the General (#6) node. In the Name (#7) field, I see the variable name used within the main dataset query. Next, I add a prompt description in the Prompt (#8) field. This description is what the end users of this report see.
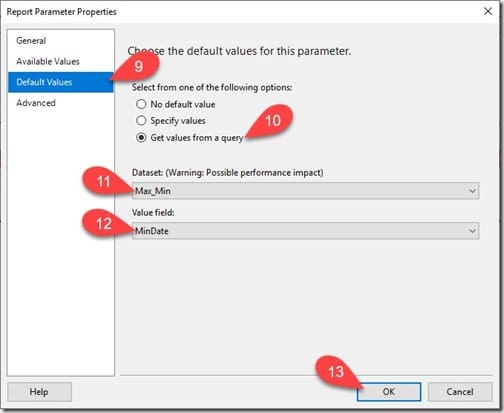
From the same window, I select the Default Values (#9) node. In this pane, I choose the third option, Get values from a query (#10). Next, I select the dataset (#11). In this case it’s Max_Min. Then in the Value field (#12) I select MinDate for the default value. Lastly, I click OK (#13) in order to close the window.
I repeat the same steps (#6 to #13) for the second prompt @MaxDate. Before clicking on the OK button, my last step is selecting MaxDate in the Value field.

In order to confirm that everything was correctly configured, I selected the preview tab (#14). Since the defaults were already setup, the dates were prepopulated! Next, I chose my date range by clicking on the calendar icons (#15 and #16). Finally, I hit the View Report button.
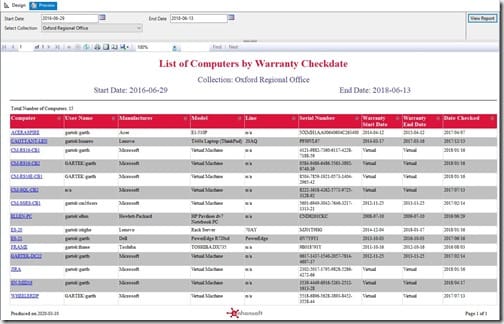
Here is the completed report. At last, I was able to come up with something similar to Power BI’s date range slicer. As you just saw, even though the results are the same, I had to make use of two prompts instead of one. I am glad that I was able to accomplish this task.
Conclusion
At times, one may spar over the features found in Power BI and SSRS, but surprisingly you can achieve almost anything with both in terms of report development. You might think that the visual interface on Power BI gives it a slightly more appealing edge over SSRS, but at the end of the day, SSRS makes-up for it with its functional flexibility. I hope y’all find this blog post useful while creating reports. If you have any questions or comments about how to create a SSRS date range prompt, you can reach out to me on Twitter @SuaresLeonard.
