Last updated on July 28th, 2022 at 01:16 pm
There is a long story behind why I needed to create a date prompt, but the short story involves some feedback from a customer. The customer wanted to see how often computers check their warranty status with Enhansoft’s Warranty Status API. Now, this blog post is not about how to check a computer’s warranty status. This post is about how to add a prompt to a SSRS report which allows the end-user to select a date and then see a list of all computers with results before the specified date.
Before I heard from this customer, I was trying to do exactly what they were looking for while working on a new Warranty Information Reporting (WIR) report. I created this new list report for computers and their warranty information according to the checkdate. The checkdate needed a prompt to allow users to select from it. If you don’t know what a checkdate is, it’s the date when the warranty status was collected. We don’t have too many WIR reports that use this standard date/time field, so this was where my adventure began.
Initially, I felt like this was a complicated task, but I was simply over-thinking it. Surprisingly, the answer was really simple and effortless. Would you like to select a date and see what computers (or objects) apply to that date? Would you like to have a nice date selecting prompt, instead of a text box formatted with yyyy-mm-dd in the prompt text? If your answer to both of these questions is, “Yes!” then you’re in luck because this blog post shows you how to create a nice date prompt.
Steps to Create a Date Prompt
In this example, I am using the new List of Computers by Warranty Checkdate report that I was telling you about earlier.
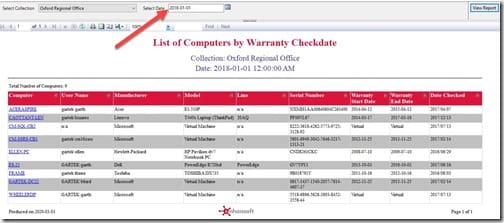
From the above image, you can see the date prompt pointed out by the arrow. I am now going to show you all of the steps involved in setting up this prompt.
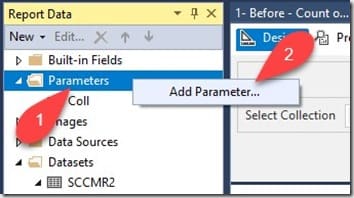
First, I start by adding a new parameter. As shown in the above image, right-click on the Parameters (#1) option under the Report Data pane. Next, click on Add Parameter… (#2).
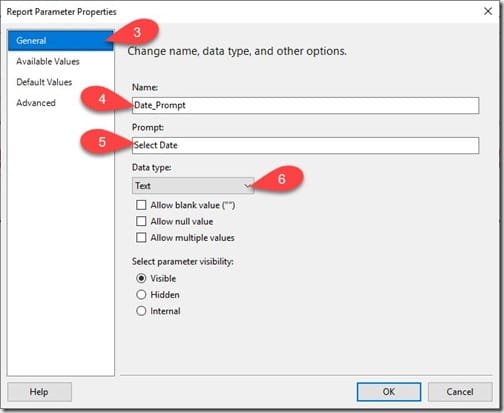
A Report Parameter Properties window opens up. From the General node, (#3) give the parameter a Name (#4) and enter the text you want to use for the prompt under the Prompt field (#5). This text helps users understand what the prompt is supposed to do. Once completed, click on the down arrow (#6) under Data type.
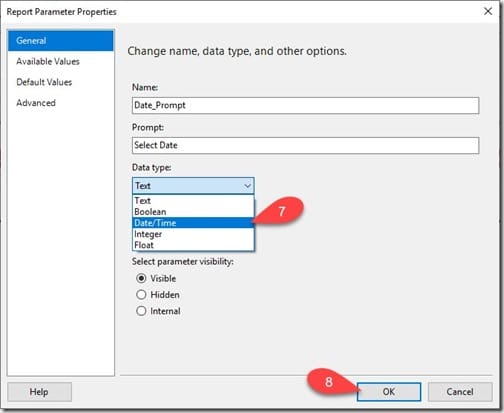
All the data types that can be assigned to the prompt are shown in the dropdown menu. Choose Date/Time (#7) and click OK (#8).
Adding the Variable to the Dataset
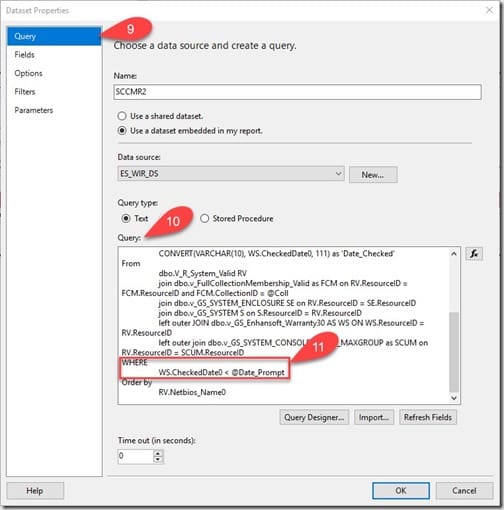
I am not going to go into a ton of details about how to edit your query. All I am going to say is that with a simple WHERE clause edit, shown above in the Query (#10), the column WS.CheckedDate0 (#11) now looks for all computers with a date less than the @Date_Prompt variable.
Previewing the Report
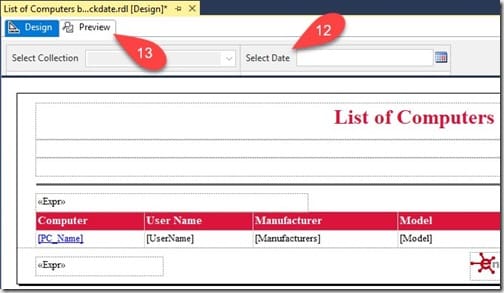
After updating the main dataset, verify that you see the date prompt (#12) under the Design layout. Once confirmed, click on the Preview (#13) tab to run the report, as shown in the image.

And now, the moment of truth. In the above image, when you click on the calendar icon (#14) a pop-up window opens up with a calendar for the user to pick a date from. Once a date is picked and a collection is chosen from the collection (#15) prompt, I click on the View Report button (#16) and let the magic happen.
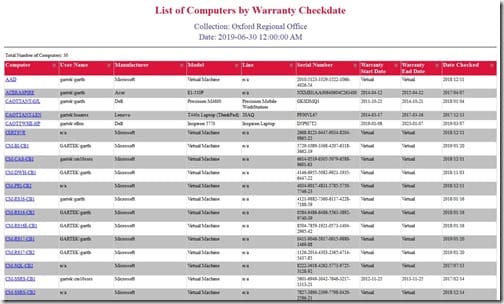
Finally, here is the customer requested report. The prompt allows customers to select a particular date and get a list of computers that are before that date. You can see the date (and time) chosen from the prompt within the subtitle of this report. I am going to show you how to format the subtitle information so that only the date appears, but that is for a later blog post.
Wasn’t it easy to create this date prompt? Originally, I thought about a date prompt using a text box prompt, but this is much better! SSRS gives you many flexible options for prompts, including the date selecting prompt, to help you customize your reports.
Conclusion
Learning about expressions and SSRS’ built-in features makes it possible to do things that you may never have thought otherwise doable within your reports. Thanks to @GarthMJ who gave me this idea to simplify the customization. I am sure that you are discovering many other possibilities to make things happen on your reports. Hope ya’ll find this helpful. If you have any questions about this blog post, you can leave a comment here or reach out to me on Twitter @SuaresLeonard.
