Last updated on July 27th, 2022 at 10:37 pm
In my original draft of another blog post, How to Add the Total Number of Rows in a SSRS Table, I wrote an entire section on the Clean and Build feature within Visual Studio. In it, I explained why I thought it was important to perform this extra step. Well, the blog post became too long, so I edited out that section. I loved it too much, however, to leave it, so I turned it into its own blog post by expanding on it in order to give you more details.
What is Clean and Build?
The short answer is: Clean and Build is a quick way to determine that SQL Server Reporting Services (SSRS) projects are healthy. It is especially important to use when you are building RDLs for different versions of SSRS, say SSRS 2008, because when you are using Visual Studio 2017, it builds for SSRS 2016 by default. If you would like more information about how to set your project to the SSRS 2008 version, please see SQL Server Data Tools (SSDT) and RDL Versions.
Clean and Build also saves me money, but I’ll explain more about that shortly.
Why Clean and Build?
If you are like me, I’m always working on multiple projects, often switching back and forth between them. This, I’m sad to say, means that I can leave a project in an unknown state. Worse is when I think, a day or two later, that I’m done, but I’m not. Unfortunately, this happened a lot, so in the office we had a piggy bank where I’d put a dollar into it every time I mistakenly thought a task was completed when it wasn’t. Now, when I use the Clean and Build feature for my projects, I know when the project build is correct, so I don’t leave a task unfinished. As a bonus, I save a dollar each time!
SSRS Clean and Build

As I explained, I now always use the Clean and Build feature on my projects before releasing the RDLs. This way I can confirm that there are no issues with them. I also recommend that you do the same!
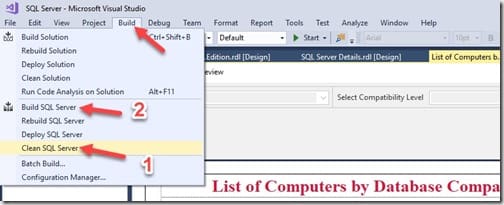
Let me show you the steps that I take to successfully Clean and Build an RDL. I start on the design page. From the Build menu, click on Clean <project name>. In my case it’s Clean SQL Server (1). This deletes all of the old (think compiled) versions of the reports.
Next, come back to the same menu and click on Build <project name>. In my case, it is Build SQL Server (2). This action builds the reports in the correct version of SSRS. Here at Enhansoft, we use SSRS 2008 as our minimum supported version of SSRS for reports.

The above image is what the output looks like when a Build is performed on reports. There are two things to look out for in this section:
Errors – You should be very concerned if any errors show up. If they do, you must fix them before proceeding because the reports will not run. When there are zero errors, I know the project is working, so my task is complete and I do not need to add a dollar to the piggy bank.
Warnings – Ideally, you never want to see warnings either. You can still run your reports because warnings simply give you a heads-up. In my case, the two warning messages, in the screenshot above, are telling me that the prompt locations are ignored. Since I’m using SSRS 2008 and not SSRS 2016 (where you can define each prompt position), I can ignore it. I know those two warning messages like the back of my hand!
I would love to hear from you about what problems you are trying to solve with ConfigMgr/SCCM/MEMCM and reporting. For any questions about the Clean and Build feature in Visual Studio, you can reach out to me on Twitter @SuaresLeonard. Until then, good luck and here is hoping you can save a dollar too!
