Last updated on September 28th, 2022 at 09:33 am
In my previous blog post, Query Designer in SQL Server Management Studio (SSMS), I showed you how to access Query Designer (also known as Design Query in Editor and Graphical Query Designer) within SQL Server Management Studio (SSMS). With Query Designer you can create SQL Server queries by using a graphical interface. The benefit of using this tool is that as you change or select items within the interface, the SQL Server query is automatically updated for you! Below are five tips that I think will make your experience with Query Designer even better!
For more details about Query Designer, please see these online docs:
Graphical Query Designer and Graphical Query Designer User Interface.
Tip #1: How to change the order of columns after a column is added to the query.
Columns are added to the SQL Server query in the order that you select them, but what if you want to change that order?
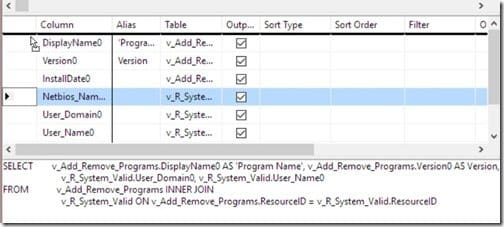
First select the column row you want to move (the row I’ve selected is highlighted in light blue) and then drag it to the correct location. In my case, I will move this column row to the very top because I want it to appear as the first column.
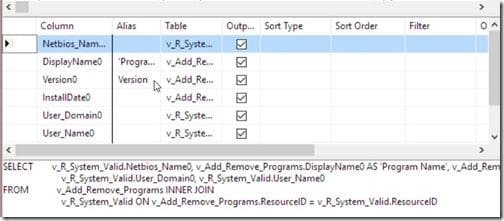
After you re-position your column you will notice that the query also changed! The name of the column I moved is now displayed first.
Use this time-saving tip any time you want to change the order of columns within a query.
Tip #2: How to remove a column from the query results.
In the example for this tip, I will show you how to remove the ResourceID column from the query results. But the same step applies to any column you may have in your query.
You can see in the screenshot below that ResourceID is selected a couple of times (see the purple arrows below) in the graphical section. Although not visible, it is also within the query itself.

You can remove any column from the query results by simply deselecting either of the two check boxes (see purple arrows above). When you deselect the check box the column will be permanently removed from the query results.
Tip #3: How to setup an Alias name for a SQL Server view.
You might be asking, “Why would I want to setup an Alias name for a SQL Server view”? In general, by employing an Alias name the query becomes easier to read by reducing the amount of text within the query.

In the example above, both lines of code are exactly the same. The first one doesn’t use an Alias name, but the second one does. Notice that the first line of code is harder to read compared to the second one because of word-wrapping. Now imagine if word-wrapping affected your entire query. That would make the query very difficult to read. So that’s why using Alias names are beneficial within SQL Server queries.
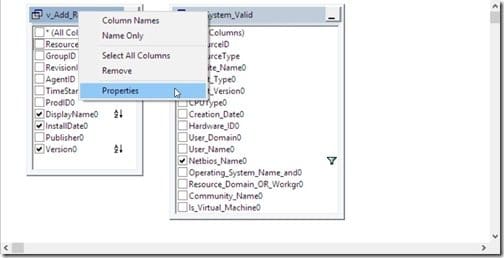
To create an Alias name for a view, select the view name and then right-click on Properties.
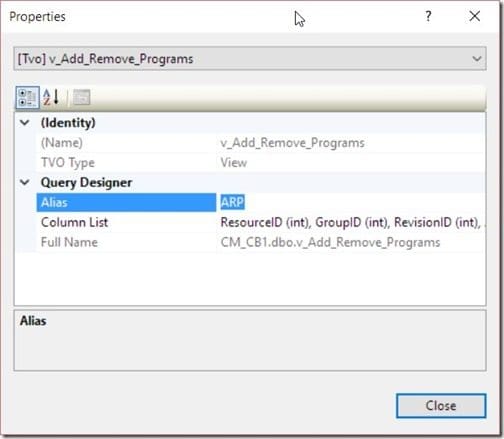
Within the Alias column provide an appropriate name. In this case I’m using ARP. Next, click on the Close button.
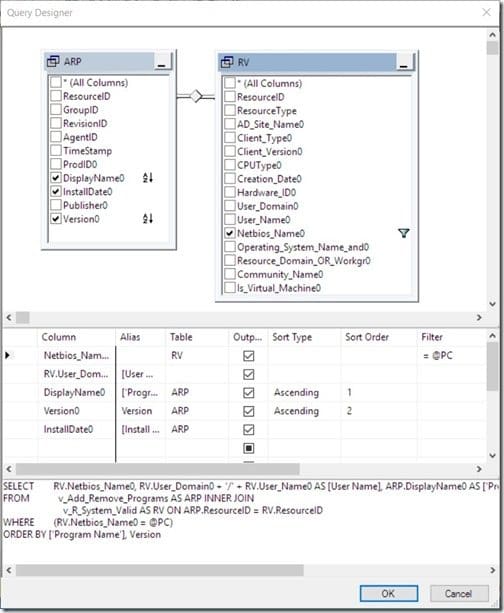
When you are done, your query might look something similar to the one above. Notice that I added the Alias names (ARP and RV) to both SQL Server views.
Tip #4: How to change the join type.
In this tip, I will show you where you can change the query join from inner to left, right or even to full join.
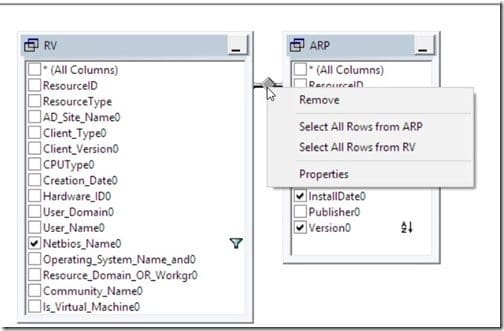
I don’t what to confuse things too much. But you can change your join within a query to any of the various types (left outer join, right outer join, full outer join, or inner join). You can do this by selecting the diamond and then right-clicking on Properties.
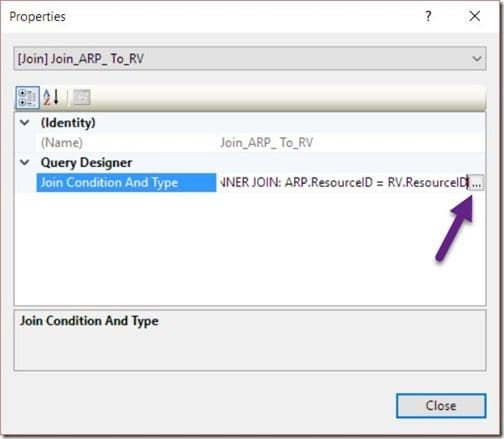
Highlight the Join Condition And Type row and then select the ellipsis button (purple arrow).
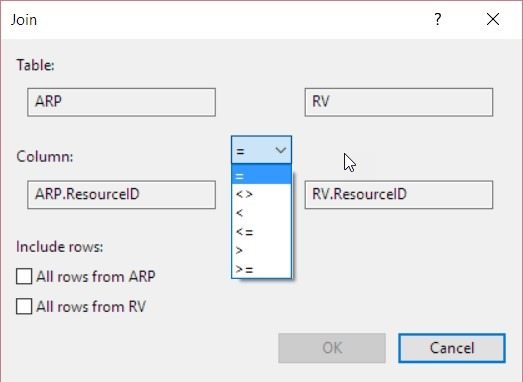
From here you can change all of the join options based on your needs.
Notice that left, right and full joins are controlled by selecting the check-boxes listed under the Include rows section of the Join window.
Tip #5: Opening an existing query in Query Designer.
Once a query is on the SSMS canvas, how can you open it up again in Query Designer? You would think that you could right-click anywhere on the query. And select Design Query in Editor, but this is not the case. Here I will show you a time-saving trick that allows you to open an existing query within Query Designer.
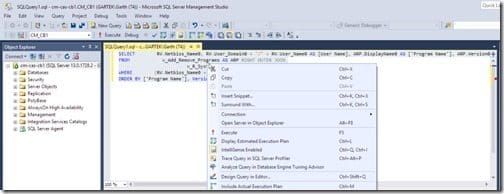
To open an existing query in Query Designer. Highlight the whole query (use ctrl-a). Then use the right-click menu and select Design Query in Editor. This will open an existing query on the SSMS canvas within Query Designer.
Note: View order within Query Designer.
This note is about how Query Designer and joins work with respect to how the views are displayed in the graphical window.
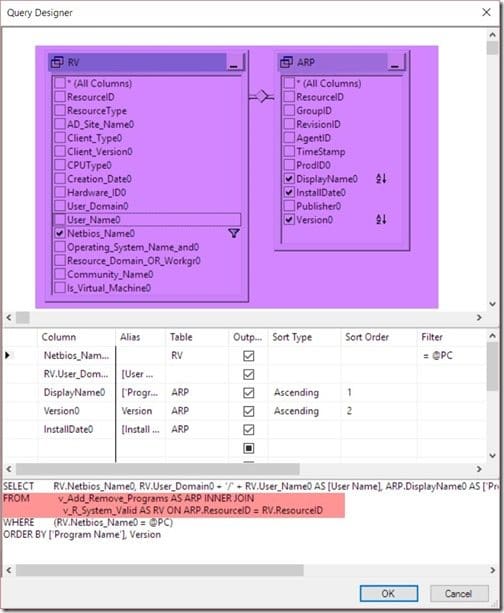
In the query window section, notice the order of the joins highlighted in red (v_Add_Remove_Programs then v_R_System_Valid).
Now look at the order of the views highlighted in purple (RV is the alias name of v_R_System_Valid and ARP is the alias name of v_Add_Remove_Programs).
Changing the order within the graphical window will have NO effect on the SQL Server query. This becomes particularly important when you create Left/Right Outer Joins and the graphical interface doesn’t visually match the order of views that are within the SQL Server query itself.
I hope that you have found these five tips useful and if you have any questions, please feel free to contact me @GarthMJ.
Do you have an idea for a blog post about a ConfigMgr query or reporting topic? Let me know. Your idea might become the focus of my next blog post!
