Last updated on August 2nd, 2022 at 09:47 am
I am in the process of finishing up a book on ConfigMgr and SSRS report writing, and my publisher requires all screenshots to be 300 DPI. For those to what to see the book it has been release already System Center Configuration Manager Reporting Unleashed. This book is great for Microsoft Endpoint Manager Configuration Manager (MEMCM / MECM / ConfigMgr ) formerly System Center Configuration Manager (SCCM / CM) admin looking create reports!
What is DPI?
This is a acronym for Dots per inch (DPI).
Like many people, I use Snagit and in Snagit 10 you could set an option to always capture your images as 300 dots per inch.
In Snagit 11 and 12, however, that option is missing (or should I say hiding) and by default the resolution of dots per inch images is 96.
Fortunately, I was able to find an easy way to convert my images to 300 DPI and I want to share this information with you!
Start by capturing your image normally.
Changing the Dots Per Inch Resolution with Snagit
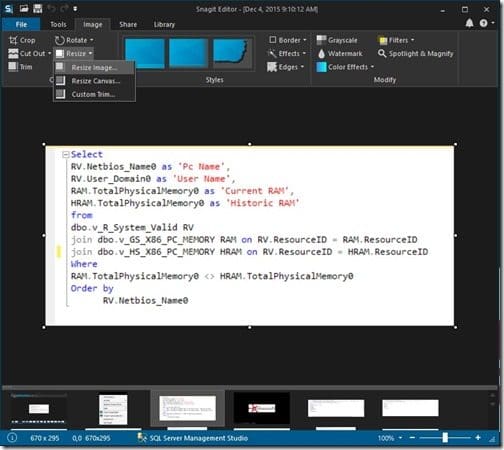
Now here’s the trick. Select the Image menu, then Resize, and then Resize Image.

Notice that the image resolution is 96 dot per inch by default. You can also see that the image dimensions are 6.98 x 3.07 inches, and 670 px x 295 px.

Change the dots per inch to 300 and click OK.
Note: When you change the DPI of a image , which is currently showing 6.98 x 3.07). It will also reduce the image size to match the update DPI. This will be 2.23 x 0.98 inches.
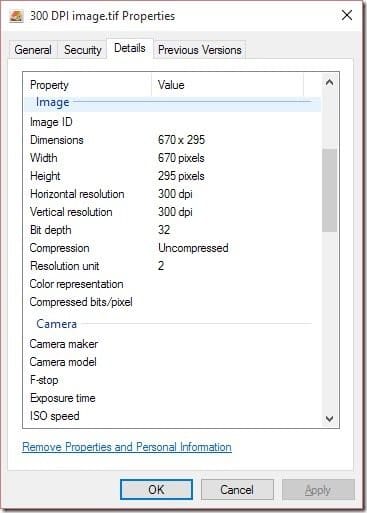
Tip: When you return to the Snagit Editor it will look like nothing changed. However, when you go to save the image, it will be 300 DPI. You can confirm this in the image properties. Notice in the screenshot below that it is 300 DPI.

Don’t forget that you can subscribe to my RRS feed to stay on top of the latest trips and tricks. If you have any questions, please feel free to touch base @Garthmj.
